If you enjoy testing new patterns, just become a follower and subscribe by GOOGLE email. When I open up testing just follow the directions and have FUN!
Tell a friend about my site please. If you are in a crochet group doing Block of the Month's or CAL's, please consider my patterns.
MY EMAIL: SmoothFoxLover@yahoo.com
Showing posts with label Video's - YouTube. Show all posts
Showing posts with label Video's - YouTube. Show all posts
If you want a .pdf copy of this pattern
or if you make this item – please click on this link below and
add your own pictures as a project on Ravelry. Just click on the crochet hook
with the words “Hook It” if this is a crochet pattern or if it is a knit
pattern click on the words “Cast On” near the top right side and this will add
your item as a project. Then you can add the pictures when you have completed
your project.
Illusion Knitting uses flat Knitting (Knits on the
right side, Purls on the wrong side) and raised Knitting (Purls on the right
side, Knits on the wrong side) to raise the colors you want. This way, when you
look at your item straight on, you see stripes of the two colors in your
project and when you look at your project from a different angle, you see the
magic of Illusion Knitting.
To Illusion knit one row on a regular chart it
takes 4 rows of Knitting. For this
pattern, the first two rows are in one color (the heart color OR the image you
are wanting to stand out) and the second two rows are in the background
color. Starting on the right side, the
first and every odd row number are Knit across all stitches. On the wrong side (every even numbered row)
you will Knit the stitches you want to raise, and Purl the stitches you want to
lay flat.
Here is the video for this project:
As my blog consists mostly of crochet
people I have made parts of the video very simple so that crocheter’s can learn
to knit. Speed thru the parts you don’t
need.
Here is the link if you need it instead of watching the video here:
Using your background color with a long tail cast
on – CO 5 stitches, PM, CO 21 stitches, PM, CO 5 stitches.
Knit 1 row BACKGROUND COLOR (in this pattern the
yellow is the background color)
This is the FILLER
section;
Row 1: K31 HEART COLOR
Row 2: K5, P21, K5 HEART COLOR
Row 3: K31 BACKGROUND COLOR
Row 4: K31 BACKGROUND COLOR
Repeat
above rows 3 or 4 times
NOTE: THE PINK 5 SQUARES TO THE RIGHT AND LEFT OF
THE ACTUAL HEART ON THE CHART ARE JUST THE BORDER STITCHES. THE ACTUAL PATTERN IS FOR THE HEART BUT DOES
INCLUDE INSTRUCTIONS FOR THE BORDER.
Charts are normally read from the bottom up, right
to left on all odd row numbers and from left to right on all even row
numbers. As this chart is the same when
read from right to left or left to right you can read from right to left on all
rows. Start in the bottom right corner
as line 1.
You can work strictly
from the chart above, instead of reading the pattern below if you’d like and
for each line of the chart do the following 4 rows:
Row 1: (heart color) knit one row plain
Row 2: (heart color) knit the border, purl the
non-heart pattern, knit the heart pattern, purl the non-heart pattern, knit the
border
Row 3: (background color) knit one row plain
Row 4: (background color) knit the border, knit
the non-heart pattern, purl the heart pattern, knit the non-heart pattern, knit
the border
If you are going to
work strictly from the chart and are going to work a scarf, you must see the
instructions at the end of the written instructions for the
second half of the scarf as you must reverse some of the rows around.
WRITTEN INSTRUCTIONS
FOR THE PATTERN START HERE:
LINE 1 OF CHART
(bottom line of chart)
Row 1: Knit HEART
COLOR (RS)
Row 2: K5, P10, K1, P10, K5 HEART COLOR
Row 3: Knit BACKGROUND
COLOR (RS)
Row 4: K15, P1, K15
BACKGROUND COLOR
LINE 2 OF CHART
Row 5: Knit HEART
COLOR (RS)
Row 6: K5, P9, K3, P9,
K5 HEART COLOR
Row 7: Knit BACKGROUND
COLOR (RS)
Row 8: K14, P3, K14
BACKGROUND COLOR
LINE 3 OF CHART
Row 9: Knit HEART COLOR
(RS)
Row 10: K5, P8, K5,
P8, K5 HEART COLOR
Row 11: Knit
BACKGROUND COLOR (RS)
Row 12: K13, P5, K13
BACKGROUND COLOR
LINE 4 OF CHART
Row 13: Knit HEART
COLOR (RS)
Row 14: K5, P7, K7,
P7, K5 HEART COLOR
Row 15: Knit
BACKGROUND COLOR (RS)
Row 16: K12, P7, K12
BACKGROUND COLOR
LINE 5 OF CHART
Row 17: Knit HEART
COLOR (RS)
Row 18: K5, P6, K9,
P6, K5 HEART COLOR
Row 19: Knit
BACKGROUND COLOR (RS)
Row 20: K11, P9, K11
BACKGROUND COLOR
LINE 6 OF CHART
Row 21: Knit HEART COLOR (RS)
Row 22: K5, P5, K11,
P5, K5 HEART COLOR
Row 23: Knit
BACKGROUND COLOR (RS)
Row 24: K10, P11, K10 BACKGROUND COLOR
LINE 7 OF CHART
Row 25: Knit HEART
COLOR (RS)
Row 26: K5, P4, K13,
P4, K5 HEART COLOR
Row 27: Knit
BACKGROUND COLOR (RS)
Row 28: K9, P13, K9
BACKGROUND COLOR
LINE 8 OF CHART
Row 29: Knit HEART
COLOR (RS)
Row 30: K5, P3, K15,
P3, K5 HEART COLOR
Row 31: Knit
BACKGROUND COLOR (RS)
Row 32: K8, P15, K8
BACKGROUND COLOR
LINE 9 OF CHART
Row 33: Knit HEART
COLOR (RS)
Row 34: K5, P3, K7,
P1, K7, P3, K5 HEART COLOR
Row 35: Knit
BACKGROUND COLOR (RS)
Row 36: K8, P7, K1,
P7, K8 BACKGROUND COLOR
LINE 10 OF CHART
Row 37: Knit HEART
COLOR (RS)
Row 38: K5, P3, K6,
P3, K6, P3, K5 HEART COLOR
Row 39: Knit
BACKGROUND COLOR (RS)
Row 40: K8, P6, K3,
P6, K8 BACKGROUND COLOR
LINE 11 OF CHART – TOP
LINE OF CHART
Row 41: Knit HEART
COLOR (RS)
Row 42: K5, P4, K4,
P5, K4, P4, K5 HEART COLOR
Row 43: Knit
BACKGROUND COLOR (RS)
Row 44: K9, P4, K5,
P4, K9 BACKGROUND COLOR
Work FILLER instuctions (SEE ABOVE AT TOP OF PATTERN) 3 or 4 times.
INSTRUCTIONS FOR A
SQUARE AND A SCARF:
FOR A SQUARE: – BIND
OFF (SEE VIDEO). CUT YARN, WEAVE ENDS.
FOR A SCARF:
Repeat rows 1 to 44 plus
the number of filler rows between each heart as many times as you wish for one
half of your scarf. Once you have
reached the half way point, begin working the pattern slightly
differently. Written instructions are
below this explanation.
GENERAL INFORMATION AGAIN:
This is just some
information if you are interested in knowing what happens now. If not, skip down to the instructions
below. You will reverse some of the the
four knitted rows it takes to work one line of the chart. You would be working
the very top line of the chart – LINE 11 – working from top to bottom but the
instructions change now.
First - Row 43
Second - Row 44
Third - Row 41
Fourth - Row 42
Then you would go down
a line of the chart and work
First – Row 39
Second – Row 40
Third – Row 37
Fourth – Row 38
Notice you are not
working from the bottom of the written instructions backwards but that you are
working the instructions within each line reversed. Ie… 43, 44, 41, 42 instead of 44, 43, 42, 41
INSTRUCTIONS FOR
SECOND HALF OF A SCARF:
LINE 11 OF CHART – TOP
LINE OF CHART
Row 43: Knit
BACKGROUND COLOR (RS)
Row 44: K9, P4, K5,
P4, K9 BACKGROUND COLOR
Row 41: Knit HEART
COLOR (RS)
Row 42: K5, P4, K4,
P5, K4, P4, K5 HEART COLOR
LINE 10 OF CHART
Row 39: Knit
BACKGROUND COLOR (RS)
Row 40: K8, P6, K3,
P6, K8 BACKGROUND COLOR
Row 37: Knit HEART
COLOR (RS)
Row 38: K5, P3, K6,
P3, K6, P3, K5 HEART COLOR
LINE 9 OF CHART
Row 35: Knit BACKGROUND
COLOR (RS)
Row 36: K8, P7, K1,
P7, K8 BACKGROUND COLOR
Row 33: Knit HEART
COLOR (RS)
Row 34: K5, P3, K7,
P1, K7, P3, K5 HEART COLOR
LINE 8 OF CHART
Row 31: Knit
BACKGROUND COLOR (RS)
Row 32: K8, P15, K8
BACKGROUND COLOR
Row 29: Knit HEART
COLOR (RS)
Row 30: K5, P3, K15,
P3, K5 HEART COLOR
LINE 7 OF CHART
Row 27: Knit
BACKGROUND COLOR (RS)
Row 28: K9, P13, K9
BACKGROUND COLOR
Row 25: Knit HEART
COLOR (RS)
Row 26: K5, P4, K13,
P4, K5 HEART COLOR
LINE 6 OF CHART
Row 23: Knit
BACKGROUND COLOR (RS)
Row 24: K10, P11, K10 BACKGROUND COLOR
Row 21: Knit HEART COLOR (RS)
Row 22: K5, P5, K11,
P5, K5 HEART COLOR
LINE 5 OF CHART
Row 19: Knit
BACKGROUND COLOR (RS)
Row 20: K11, P9, K11
BACKGROUND COLOR
Row 17: Knit HEART
COLOR (RS)
Row 18: K5, P6, K9, P6,
K5 HEART COLOR
LINE 4 OF CHART
Row 15: Knit
BACKGROUND COLOR (RS)
Row 16: K12, P7, K12
BACKGROUND COLOR
Row 13: Knit HEART
COLOR (RS)
Row 14: K5, P7, K7,
P7, K5 HEART COLOR
LINE 3 OF CHART
Row 9: Knit HEART
COLOR (RS)
Row 10: K5, P8, K5,
P8, K5 HEART COLOR
Row 11: Knit
BACKGROUND COLOR (RS)
Row 12: K13, P5, K13
BACKGROUND COLOR
LINE 2 OF CHART
Row 7: Knit BACKGROUND
COLOR (RS)
Row 8: K14, P3, K14
BACKGROUND COLOR
Row 5: Knit HEART
COLOR (RS)
Row 6: K5, P9, K3, P9,
K5 HEART COLOR
LINE 1 OF CHART (bottom line of chart)
Row 3: Knit BACKGROUND
COLOR (RS)
Row 4: K15, P1, K15
BACKGROUND COLOR
Row 1: Knit HEART
COLOR (RS)
Row 2: K5, P10, K1, P10, K5 HEART COLOR
This is the FILLER
section which is no longer like the top filler section;
This
pattern has been tested. Please notify
me of any pattern corrections. I will answer any and all questions you may have
with the instructions. Do not
plagiarize this pattern. All
patterns are my original designs. Please do not re-sell my patterns or give
them away for free or post my patterns on the Internet. You may sell items you
make from my patterns at craft fairs, fund raisers or custom orders for friends
and family but please do not sell finished items on the Internet without my
written permission.
This pattern is
copyrighted by me and I give my permission for you to post pictures of items
made from my pattern on your website if you will post a link back to my Ravelry
store if the pattern is for sale. If
the pattern is free, please direct people to my blog: http://SmoothFoxLover.blogspot.com Be sure to list the name SmoothFox as the
designer.
Hobby Lobby “I
Love This Yarn” 4 ply medium worsted yarn
Color A: Mulberry
Color B: Jelly
Bean
Hook Size: I/9 5.50 mm
Size: 6”
x 6”
Skill level:
Advanced beginner
Notions: Yarn needle
SPECIAL STITCHES:
FPDC – Front Post Double Crochet –
Yarn
over, insert hook behind post of stitch (from front to back), yarn over, pull
through, bring up even with last stitch completed, yarn over, pull through 2
loops, (2 loops on hook), yarn over, pull through remaining 2 loops to complete
stitch
If you want a .pdf copy of this pattern
or if you make this item – please click on this link below and
add your own pictures as a project on Ravelry. Be sure to login to your
Ravelry account. Just click on the
crochet hook with the words “Hook It” if this is a crochet pattern or if it is
a knit pattern click on the words “Cast On” near the top right side and this
will add your item as a project. Then you can add the pictures when you have
completed your project.
Note: Some rounds end with a ch-1 plus a half
double crochet into the top of the beginning ch-3 to position the hook in the
proper position for the following round.This joining will be referred to as a space when completed.
INSTRUCTIONS:
Here is the link to
the video for this project:
SmoothFox's Cool 2B Square Video
Round 1: Using Color A ch 4, join with a slip st in 4th
ch from hook to form a ring, ch 3 counts as dc in this and all rounds, 2
dc, ch 2, *(3 dc, ch 2) 3 times; join with a slip st in the top of beg ch-3.
Finish off. (12 dc, 4 ch-2 sps)
Round 2: Using color B join with a slip st in any
corner, ch 3, dc in same corner, *fpdc around first st, dc in next st, fpdc
around last st, **(2 dc, ch 2, 2 dc) in corner,* repeat from * to * 2 times and
from * to ** once; 2 dc in beg corner, join with ch 1 plus hdc in top of beg
ch-3. (8 fpdc, 20 dc, 4 ch-2 sps)
Round 3: Ch 3, dc in same corner, *sk 1 st, [fpdc
around the next st, dc in next st] 2 times, fpdc around next st, sk last st,
**(2 dc, ch 2, 2 dc) in corner,* repeat from * to * 2 times and from * to **
once, 2 dc in beg corner; join with ch 1 plus hdc in top of beg ch-3. Finish
off. (12 fpdc, 24 dc, 4 ch-2 sps)
Round 4:Using color A join with slip st in any
corner, ch 3, dc in same corner, *[sk 1 st, 2 dc in next st] 4 times, sk last
st, **(2 dc, ch 2, 2 dc) in corner,* repeat from * to * 2 times and from * to *
once, 2 dc in beg corner; join with ch 1 plus hdc in top of beg ch-3. (48 dc, 4
ch-2 sps)
Note: Excluding corners, all stitches in next
round are worked in the center/middle of the 2 dc groupings and not between the
2 dc groupings
Round 5: Ch 3, dc in same corner, *sk 1 st, [2 dc
before next st, sk 2 sts] 5 times, 2 dc before next st, sk 1 last st, **(2 dc,
ch 2, 2 dc) in corner,* repeat from * to * 2 times and from * to * once, 2 dc
in beg corner; join with ch 1 plus hdc. Finish off. (64 dc, 4 ch-2 sps)
Won’t you please take a few moments to
make a square for a wonderful charity that is in great need of squares to help the less fortunate.
Mail to:
Online Angels
Attn: SmoothFox
36 B Pine Drive
Pottsville, PA 17901
Please include your name, State or Country and
square count on a small note so that Mary with Online Angels can send me your
info to post on my blog.
This
pattern has been tested. Please
notify me of any pattern corrections. I will answer any and all questions you
may have with the instructions. Do not
plagiarize this pattern. All
patterns are my original designs. Please do not re-sell my patterns or give
them away for free or post my patterns on the Internet. You may sell items you
make from my patterns at craft fairs, fund raisers or custom orders for friends
and family but please do not sell finished items on the Internet without my
written permission. Do not claim designs as your own.
This pattern is
copyrighted by me and I give my permission for you to post pictures of items
made from my pattern on your website if you will post a link back to my Ravelry or Craftsy store if the pattern is for sale.If
the pattern is free, please direct people to my blog.Be sure to list the name SmoothFox as the designer.
Years ago I was into doing ceramics and made a small chicken sitting on a basket and gave it to my sister. She loves that little ceramic dish. Anyway, last Christmas I told her I'd make her a cozy to go over her French Press a.k.a. Cafetière. I then promptly forgot her request until she reminded me a couple of weeks ago.
I set about creating what I thought was a chicken sitting in a nest cozy. My husband walks in and see's it and says "Cute Owl" so I was shocked yet laughed and looked at it closely and thought, yeah it could be an owl. However, once I was done with it I also thought it could be a DoDo Bird.
Anyway, here is the video and if you know how to knit and crochet I believe you can follow the video to make it.
Please check out my latest video below. You can make scarves and blankets with the continuous method by just sewing together the long strips. No need to join individual squares as they are crocheted as a strip
I apologize ahead of time for the final video within Clue 6. It took 8 or 9 video's cut together to create the one video in the pattern. I was crocheting the final rounds and was pausing the video camera and unknown to me, my husband or maybe my SmoothFox terrier somehow moved the tri-pod that was holding the camera just slightly between different pauses in the video. Once I had finished crocheting and the final video was complete, I pasted them all together. Created one long video and sat down to watch it. I had no idea that in some of the video's that I was off frame to the right. I am not going to go back and remake the video. The instructions are in the pattern and if you listen to the video, I'm explaining what I did while I am slightly off screen.
Please do not send me emails asking me to remake the video nor send me mean emails telling me the video is horrible. I am apologizing ahead of time and also apologized in the video before you begin watching it.
SmoothFoxHelperCindy is learning to knit so I decided to make her a few video's. After making the video's for her, I thought a couple of people out there might want to watch them also so I've made them available to the public. I'm not an expert knitter and don't claim to be. Anyone new to knitting who wants to follow along, we will be knitting a simple stripped knitted hat. I've just been updated today - finally - with YouTube so I can now make longer video's. We're not talking full length movies mind ya LOL, however I should be able to get a full project into one video.
When I was first learning to knit I searched for video's to learn to knit a hat. However I wanted it put together all in one project so I could see how a full hat was made. All I found were video's that never showed the entire project so I was highly frustrated. There are 4 video's below and I'll be adding more to this blog posting to complete the entire hat within the next few days.
I'm hoping that Cindy doesn't get to frustrated in me because I'm not an expert but I just figured she could watch more experienced knitters if she got stumped on a certain part or I could do another video. My problem in these video's is that Cindy is working the hat flat (not on a circular knitting needle) and I'm trying to show her how to use circular knitting needles for a hat.
I have no doubt that those experienced knitters out there who are familiar with working a hat "flat" will find fault with the video's and if you will email me (not all at once) with my mistakes, as I still have more video's to make for Cindy, I'll address what I told her in prior video's that was incorrect from your emails.
I posted two new YouTube video's last weekend for the Round Spiral Granny and have taken them down. I'm working on the pattern and revising the pattern to make it better.
Those few of you who are subscribed and saw the video, please disregard what you learned in the video until I make the changes.
If you make this item – please click on this link below and add your own pictures as a project on Ravelry. Just click on the crochet hook with the words “Hook It” if this is a crochet pattern or if it is a knit pattern click on the words “Cast On” near the top right side and this will add your item as a project. Then you can add the pictures when you have completed your project.
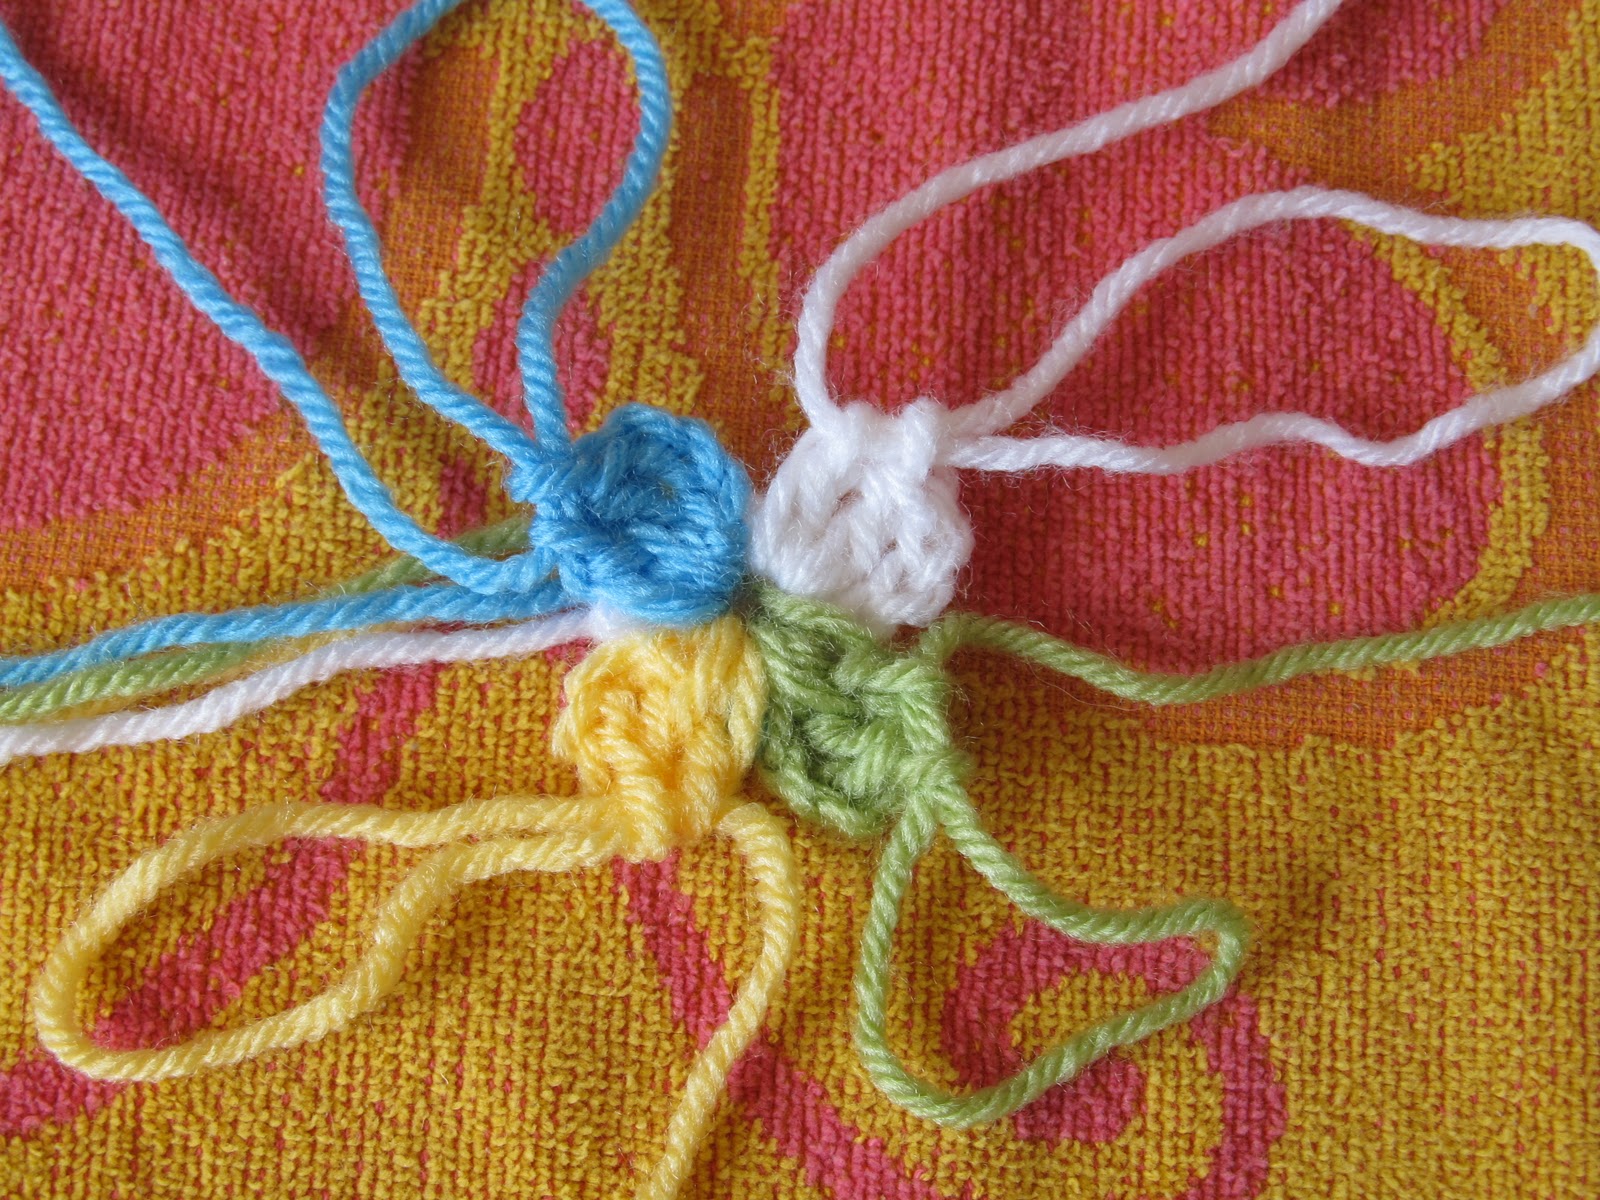
PLEASE READ BEFORE BEGINNING YOUR SQUARE OR BLANKET
This project must be worked with four separate balls of yarn. You can work with 4 different colors of yarn. You can work with 3 balls of one color and one ball of a contrasting color. You can work with two balls of one color and two balls of another color.
THERE ARE TWO YOUTUBE VIDEO’S SHOWING HOW THIS PATTERN WORKS.
INSTRUCTIONS:
Note: You can crochet over your beginning yarn tails however do not crochet over your working yarn by mistake.
IF WORKING 3 BALLS OF ONE COLOR AND 1 CONTRASTING COLOR, COLOR D SHOULD BE YOUR CONTRASTING COLOR.
IF WORKING 2 BALLS OF ONE COLOR AND 2 BALLS OF CONTRASTING COLOR, COLOR A AND B SHOULD BE THE SAME COLOR AND COLOR C AND COLOR D SHOULD BE THE CONTRASTING COLOR
Using color A, ch 4, join with a slip st in 4th ch from hook to form a ring.
Step 1: (Ch3, 2 dc) in ring, pull up loop of yarn, drop color A;* join color B with a slip st in ring, (ch3, 2 dc) in ring, pull up loop of yarn, drop color B; join color C with a slip st in ring, (ch3, 2 dc) in ring, pull up loop of yarn, drop color C; join color D with a slip st in ring, (ch3, 2 dc) in ring, pull up loop of yarn, drop color D. (12 dc)
Step 2: *Pick up color A, tighten yarn slightly, ch 1 plus hdc in top of ch-3 of next color of yarn corner made, ch 3, 2 dc in corner, pull up loop of yarn, drop current color of yarn;* repeat from * to * with each color of yarn. (12 dc, 4 hdc, 4 ch-1 sps)
IN THE VIDEO I CONTINUED USING THE LAST COLOR USED FROM PRIOR ROUND. THE PATTERN IS WRITTEN AS IF YOU ALWAYS START WITH COLOR A.
Step 3: *Pick up color A, tighten yarn slightly, ch 1, 3 dc in next sp, ch 1 plus hdc in top of ch-3 of next color of yarn corner made, ch 3, 2 dc in just made corner, pull up loop of yarn, drop current color yarn;* repeat from * to * with each color of yarn. (24 dc, 4 hdc, 8 ch-1)
Step 4: *Pick up color A, tighten yarn slightly, (ch 1, 3 dc in next sp) repeat across to corner, pull up loop of yarn, drop current color yarn;* repeat from * to * with each color of yarn in turn. (24 dc, 8 ch-1)
Step 5: *Pick up color A, tighten yarn slightly, ch 1 plus hdc in top of ch-3 of next color of yarn corner made, ch 3, 2 dc in corner, (ch 1, 3 dc in next sp) repeat across to corner, pull up loop of yarn, drop current color of yarn;* repeat from * to * with each color of yarn.
Note last color worked will have one more set of 3 dc’s than the rest of the colors. (39 dc, 13 ch-1 4 hdc)
Step 6: *Pick up color A, tighten yarn slightly, if there are available spaces along the side of square (ch 1, 3 dc in next sp) repeat between ( ) across to corner, ch 1 plus hdc in top of ch-3 of next color of yarn corner made, ch 3, 2 dc in corner, (ch 1, 3 dc in next sp) repeat across to corner, pull up loop of yarn, drop current color yarn;* repeat from * to * with each color of yarn in turn
Repeat Step 6 until you are ready to finish off you square or blanket.
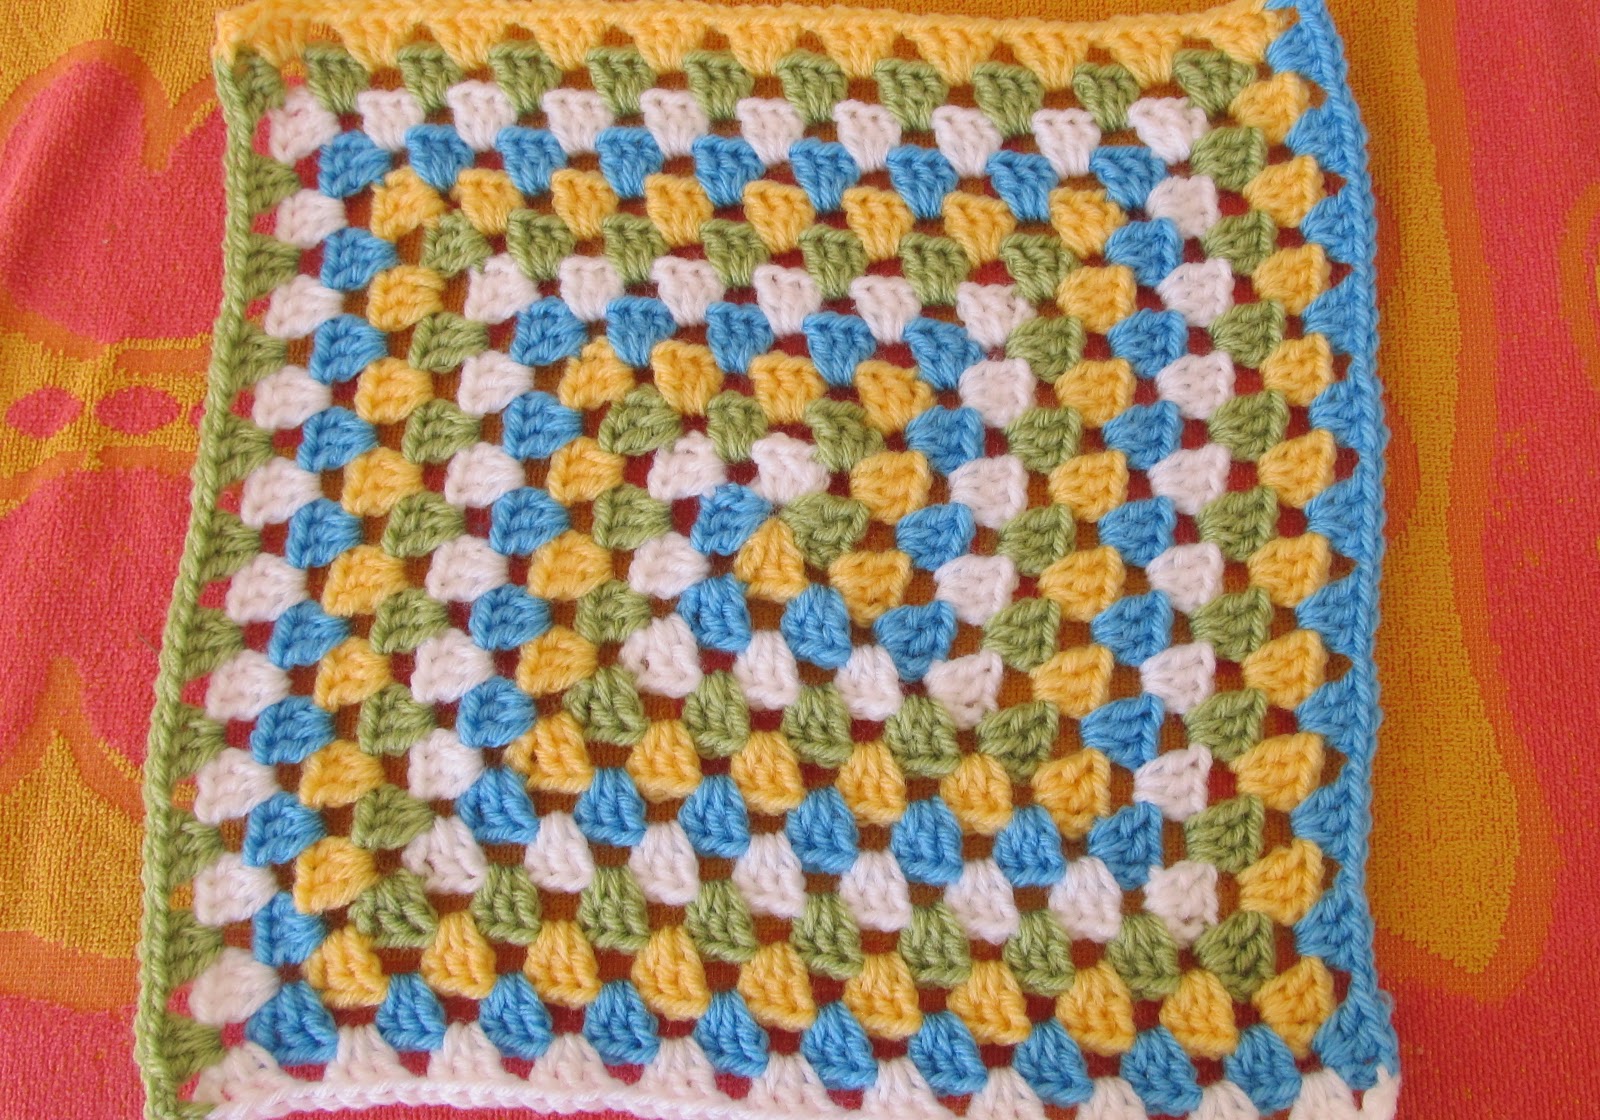
FOR A 6X6 SQUARE WORK UNTIL THERE ARE FIVE SETS OF 3 DC’S ON EACH SIDE THEN FOLLOW FINISHING STEP BELOW.
FOR A 12X12 SQUARE WORK UNTIL THERE ARE 11 SETS OF 3 DC’S ON EACH SIDE THEN FOLLOW FINISHING STEP BELOW.
INSTRUCTIONS FOR BLANKETS:
FOR A BLANKET WORK UNTIL YOUR APPROXIMATE SIZE.
FOR A BLANKET CONSISTING OF 3 BALLS OF ONE COLOR AND 1 BALL OF ANOTHER COLOR, YOU NEED TO DO THE FOLLOWING. LOOK AT TOP PICTURE ON PAGE ONE. NOTICE THAT TO END, THE CONTRASTING COLOR MUST BE ON ONE SIDE. NOTICE THAT ONE SIDE WILL HAVE 3 ROUNDS OF THAT COLOR, ONE ROUND WILL HAVE 2 ROUNDS OF THAT COLOR AND ONE ROUND WILL HAVE ONE ROUND OF THAT COLOR. IF YOUR BLANKET LOOKS LIKE THE PICTURE ON PAGE ONE, YOU ARE SET TO FINISH OFF.
FOR A BLANKET THAT CONSISTS OF 4 DIFFERENT COLORS OF YARN, YOU CAN’T FINISH OFF UNLESS EACH SIDE HAS ONE COLOR OF YARN. SO IF YOU HAVE GOTTEN AHEAD OF YOURSELF AND HAVE LET’S SAY ONE COLOR OF YARN ON TWO SIDES, YOU WILL NEED TO UNRAVEL OR CONTINUE UNTIL YOU HAVE ONE COLOR OF YARN PER SIDE. NOW YOU ARE SET TO FINISH OFF.
FOR A BLANKET THAT CONSISTS OF 2 DIFFERENT COLORS OF YARN, YOU CAN’T FINISH OFF UNLESS EACH SIDE HAS ONE COLOR OF YARN. SO IF YOU HAVE GOTTEN AHEAD OF YOURSELF AND HAVE LET’S SAY ONE COLOR OF YARN ON THREE SIDES, YOU WILL NEED TO UNRAVEL OR CONTINUE UNTIL YOU HAVE ONE COLOR OF YARN PER SIDE. NOW YOU ARE SET TO FINISH OFF.
FINISHING
Count shells on all sides. They must be even. Each side should only contain one color of yarn. Four colors of yarn should have 4 sides of one color of shells.
Finishing Step: *Ch 1, 3 dc in each sp across to corner, ch 1 plus hdc in top of ch-3 of next color. Finish off;* repeat from * for all colors.
Created by Donna Mason-Svara aka SmoothFoxLover@yahoo.com 2011
This pattern has been tested. Please notify me of any pattern corrections. I will answer any and all questions you may have with the instructions. Do not plagiarize this pattern. All patterns are my original designs. Please do not re-sell my patterns or give them away for free or post my patterns on the Internet. You may sell items you make from my patterns at craft fairs, fund raisers or custom orders for friends and family but please do not sell finished items on the internet without my written permission. Do not claim designs as your own.
This pattern is copyrighted by me and I give my permission for you to post pictures of items made from my pattern on your website if you will post a link back to my ETSY store if the pattern is for sale. If the pattern is free, please direct people to my blog. Be sure to list the name SmoothFox as the designer.
Here are two links to my latest YouTube video's. UPDATE: Pattern is in testing right now.
PART ONE IS ABOVE
PART TWO IS ABOVE
I believe that the pattern can be worked without a written pattern if you follow along with the video. I will however, create a written pattern so that it will teach you how to finish off. Oh and PLEASE SUBSCRIBE to my video's so I know that people are actually watching and interested. The more subscribers, the more video's I'll do.
So grab 4 colors of contrasting yarn and a size "H-8- 5.00 mm" hook and follow along.
If you want a .pdf copy of this pattern or if you make this item – please click on this link and add your own pictures as a project on Ravelry. Just click on the crochet hook with the words “Hook It” if this is a crochet pattern or if it is a knit pattern click on the words “Cast On” near the top right side and this will add your item as a project. Then you can add the pictures when you have completed your project.
This pattern is also available on YouTube as two instructional videos so you can crochet with me.
INSTRUCTIONS:
Using color A ch 5, join with a slip st to form a ring or use the magic ring.
Round 1: Ch 3, 15 dc in ring, join with a slip st in 3rd ch of beg ch-3. PULL UP LARGE LOOP WITH YARN – INSERT A STITCH HOLDER (16 dc)
Round 2: Join color B with a slip st one st to the left that you just joined the last round together, ch 3, 3 dc in same st, sk 1 st, *(4 dc in next st, sk 1 st) repeat from * around, BEFORE JOINING - Take color A yarn and bring it all forward, (the loop and the yarn to the skein) This yarn must be in front of the piece you are crocheting before you continue, join color B with a slip st in the top of beg ch-3. Finish off color B. (32 dc)
Round 3: Using color A, ch 5, sc in ridge behind 2nd dc of 4 dc grouping, ch 2, *(dc in sk st from round 1, ch 2, sc in ridge behind 2nd dc of 4 dc grouping, ch 2)* repeat from * around; join with a slip st in 3rd ch of beg ch-5. (8 dc, 8 sc, 16 ch-2 sps)
Round 4: Ch 1, sc in same st, *sk ch-2 sp, (3 dc, ch 3, 3 dc) in next sc, sk ch-2 sp, sc in next dc, petal made,* repeat from * around to last petal, sk ch-2 sp, (3 dc, ch 3, 3 dc) in next sc, sk ch-2 sp, join with slip st in beg sc. Finish off. (48 dc, 8 ch-3 sps, 8 sc) STOP AFTER ROUND 4 IF YOU WANT AN APPLIQUE OR TO MAKE A SCARF.
Round 5: Using color C join with slip st in sc between petals, ch 4, (2 tr, ch 3, 3 tr), *sk 3 sts, sc in back ridge of 2nd ch of ch-3 sp, ch 1, sk 3 sts, 4 hdc in sc, ch 1, sc in back ridge of 2nd ch of ch-3 sp, sk 3 sts, **(3 tr, ch 3, 3 tr) in sc,* repeat from * to * 2 times and from * to ** once; join with a slip st in top of beg ch-4. Finish off. (24 tr, 16 hdc, 8 sc, 4 ch-3 sps, 8 ch-1 sps)
Round 6: Using color D join with slip st in any corner, ch 3, (2 dc, ch 3, 3 dc) in corner, *sk 1 st, dc in next 3 sts, dc in ch-1 sp, dc in next 4 sts, dc in ch-1 sp, dc in next 3 sts, sk last st, **(3 dc, ch 3, 3 dc) in corner,* repeat from * to * 2 times and from * to ** once; join with a slip st in top of beg ch-3. Finish off. (72 dc, 4 ch-3 sps)
Created by Donna Mason-Svara aka SmoothFoxLover@yahoo.com 2011
This pattern has not been tested. Please notify me of any pattern corrections. I will answer any and all questions you may have with the instructions. Do not plagiarize this pattern. All patterns are my original designs. Please do not re-sell my patterns or give them away for free or post my patterns on the Internet. You may sell items you make from my patterns at craft fairs, fund raisers or custom orders for friends and family but please do not sell finished items on the internet without my written permission. Do not claim designs as your own.
This pattern is copyrighted by me and I give my permission for you to post pictures of items made from my pattern on your website if you will post a link back to my Ravelry store if the pattern is for sale. If the pattern is free, please direct people to my blog. Be sure to list the name SmoothFox as the designer.
This pattern is also available on YouTube as my first tutorial videos.
If you want a .pdf copy of this pattern or if you make this item – please click on this link and add your own pictures as a project on Ravelry. Just click on the crochet hook with the words “Hook It” near the top right side and this will add your item as a project. Then you can add the pictures when you have completed your project.
Row 1: Ch 18, dc in 4th ch from hook, dc in next 14 ch’s. (16 dc)
Row 2: Ch 4, turn, 3 dc around the ch 4, sk 2 sts, sc in next st, *(ch 4, 3 dc around the ch-4, sk 2 sts, sc in next st) repeat across. Ch 3, turn. (16 dc, 5 sc, 5 ch-4 sps)
Row 3: Sc in tip of ch-4 sp, *(ch 3, sc in next tip of ch-4) repeat across. Ch 3, turn. (4 ch-3 sps, 5 sc)
Row 4: *(3 dc in ch-3 sp, dc in sc) repeat across to last ch-3 sp, 2 dc in ch-3 sp, dc in last sc. (16 dc)
FOR A SCARF REPEAT ROW 2, 3, 4 UNTIL SCARF IS ABOUT 60” LONG.
FOR SQUARE – CONTINUE BELOW
Row 5: Repeat row 2
Row 6: Repeat row 3
Row 7: Repeat row 4
Now we will work around the entire square to create a 16 st dc border around it.
Round 1: Ch 3, (dc, ch 3, 2 dc) in top of first st, working across the side of the square – 14 dc across the side of the square, (2 dc, ch 3, 2 dc) in top of first st across the bottom of square, sk 1st st, dc in next 14 sts across bottom of square, sk next st, (2 dc, ch 3, 2 dc) in top of next st, working up the side of the square – 14 dc across the side of the square, (2 dc, ch 3, 2 dc) in top of the ch-3, sk 1st st, dc in next 14 sts, slip st in top of beg ch-3. (64 dc, 4 ch-3 sps)
Created by Donna Mason-Svara aka SmoothFoxLover@yahoo.com 2010
This pattern has not been tested. Please notify me of any pattern corrections. I will answer any and all questions you may have with the instructions. Do not plagiarize this pattern. All patterns are my original designs. Please do not re-sell my patterns or give them away for free or post my patterns on the Internet. You may sell items you make from my patterns at craft fairs, fund raisers or custom orders for friends and family but please do not sell finished items on the internet without my written permission. Do not claim designs as your own.
This pattern is copyrighted by me and I give my permission for you to post pictures of items made from my pattern on your website if you will post a link back to my Ravelry store if the pattern is for sale. If the pattern is free, please direct people to my blog. Be sure to list the name SmoothFox as the designer.