March 27, 2011

Testers Found - Fox's Friends Square 12x12

UPDATE:  TESTERS ARE - ANITA, DARLEAN, SERENE, STEPHANIE, VALERIE, ANGEL, ASHIA, DENA, SHAW, BRENDA, ELAINE, TERI, GABY, JUDI, CATHY, LAVINA, MARCUS, JENNY, DENISE, GAYLE, JAN 

This square is dedicated to a friend of a friend, Sal, who recently passed away.  This pattern may seem familiar as it was created while I was crocheting one of the Charity Patterns and I just kept going.  The name of this pattern may change as I'm mulling over the name of the pattern.

If you want to be a tester, read the instructions below and let's get started!

When I find enough testers I go back and change the title of this posting from Testers Wanted to Testers Found. Before emailing me, please go back and check this link to see if the title has been changed. If the title has been changed, PLEASE do not email me asking to test. If you are currently testing an item and I haven't received your picture yet as you can not ask to test this item.

1. Must be a follower of this blog and a subscriber.

2. Must be able to finish testing by Thursday March 31, 2011

3. Must be able to send me a picture of your finished item attached to an email. People not following through and sending me a picture or not posting on Ravelry will no longer be able to test future patterns.

4. Must be able to send me errors of any kind you find in the pattern.

5. It is mandatory as of January 23, 2011 that all testers add their test projects on Ravelry after I post the link to the pattern. Once I post the pattern, you'll need to go back to Ravelry and link it to the proper pattern. If you posted your project ahead of time, it won't be linked to the pattern without using the exact name I called the pattern once it was posted. Anyway, believe me, I will be checking. If 10 people want to test, there should be 10 projects on Ravelry.

6. You can use whatever colors of yarn you'd like

If you want to test, send me an email to the address below with your Follower name. Only the first people emailing me will receive the pattern to test. I respond to all requests. If you don't receive a response, send another email as your original email may have gone into spam.

Please don't post a comment that you'd like to test. I can't send a copy of the pattern to a "comment." You have to email me as it states. Don't send me a comment through the Google feed that you want to test. You must use the email address below.

Donna SmoothFoxLover@yahoo.com

March 18, 2011

2 YouTube video's taken down

I posted two new YouTube video's last weekend for the Round Spiral Granny and have taken them down.  I'm working on the pattern and revising the pattern to make it better.

Those few of you who are subscribed and saw the video, please disregard what you learned in the video until I make the changes.

Donna

March 15, 2011

SmoothFox's Four Color Spiral Blanket - Free Pattern


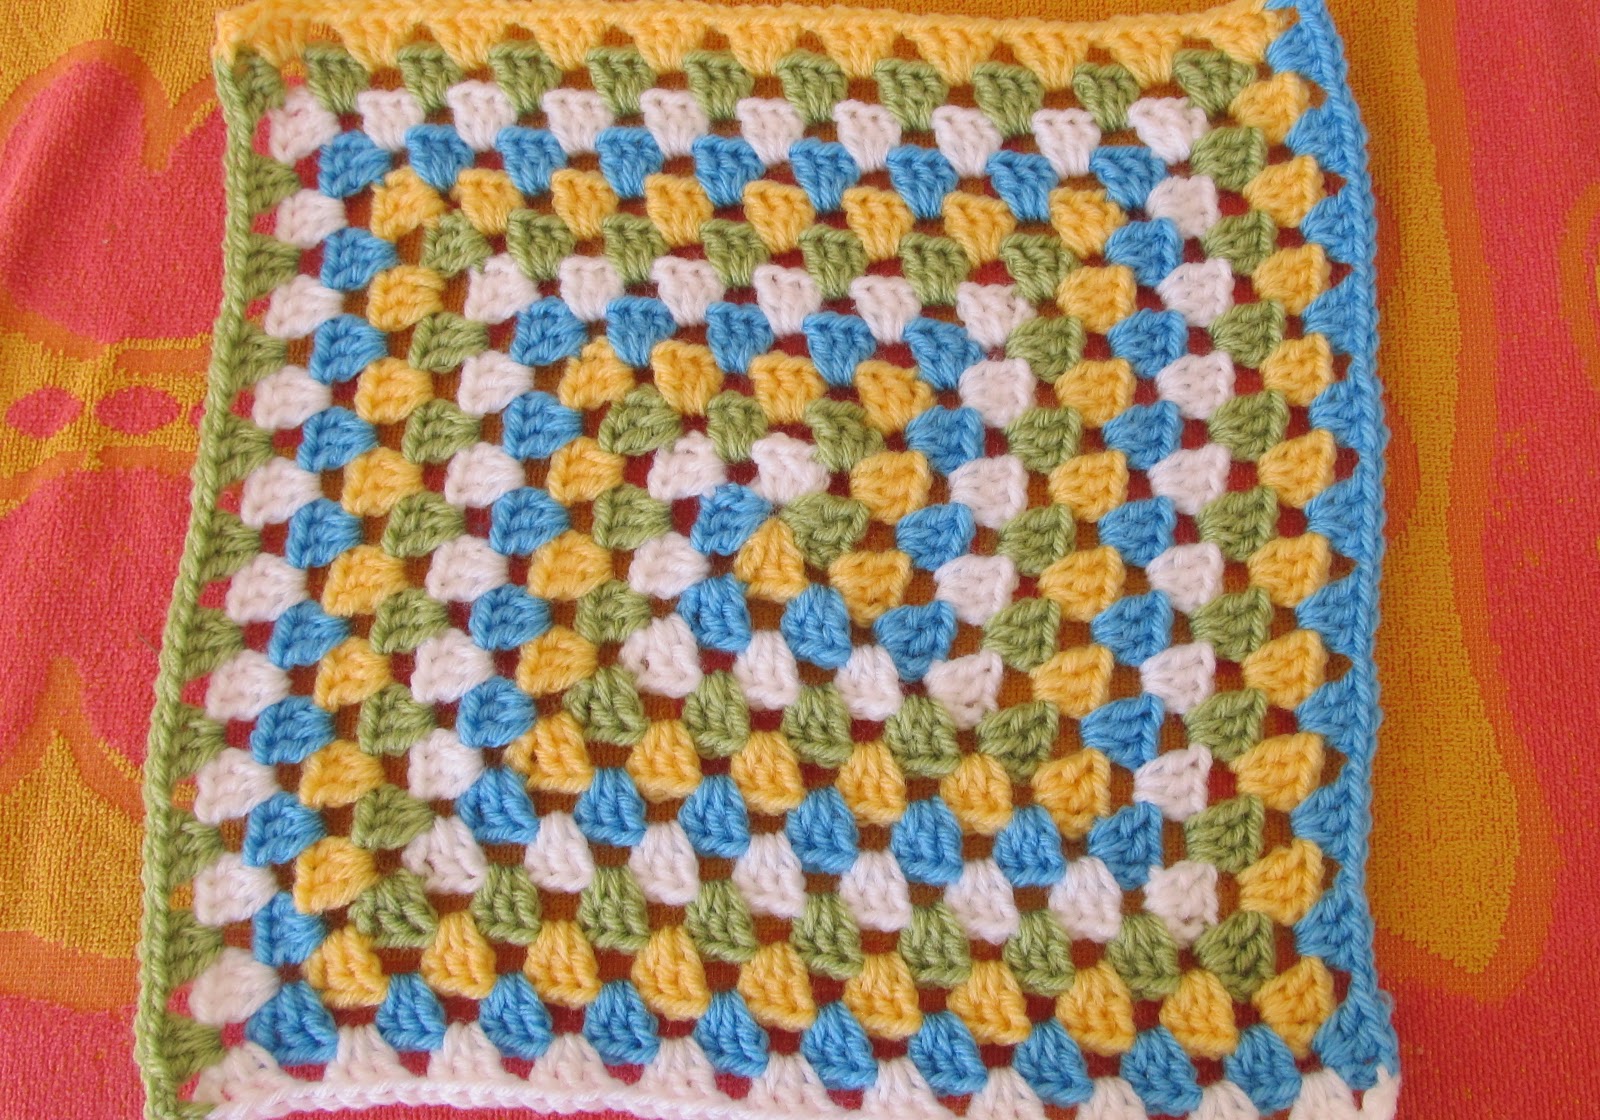
SmoothFox’s Four Color Spiral Blanket
Created by Donna Mason-Svara aka SmoothFox Copyright 2011 Version 1.0

Hobby Lobby “I Love This Yarn!” 4 ply medium worsted
(1 skein, 7 oz, 355 yards of each color for newborn size blanket)

Color A - White
Color B - Soft Pink
Color C - Cream
Color D - Pistache

Hook Size I - 9 - 5.50 MM
Yarn needle
Split-Ring Stitch Holders – 4

Special Stitches:
Group – For the purposes of this pattern a group is all stitches between two ch-1 spaces.

My Ravelry Store: http://www.ravelry.com/stores/smoothfox-crochet-designs
My Etsy Store: http://smoothfox.etsy.com/
My Crochet & Knit related gifts: http://zazzle.com/smoothfox*
My blog: http://smoothfoxlover.blogspot.com/

If you make this item – please click on this link below and add your own pictures as a project on Ravelry. Just click on the crochet hook with the words “Hook It” if this is a crochet pattern or if it is a knit pattern click on the words “Cast On” near the top right side and this will add your item as a project. Then you can add the pictures when you have completed your project.

http://www.ravelry.com/patterns/library/free-smoothfoxs-four-color-spiral-blanket


UPDATE:

PLEASE READ BEFORE BEGINNING YOUR BLANKET.

THIS PROJECT MUST BE WORKED WITH FOUR SEPARATE SKEINS OF YARN.

This blanket looks it’s best when worked with 3 skeins of one color and 1 skein of a contrasting color. COLOR A SHOULD BE YOUR CONTRASTING COLOR.

You can also work with 2 skeins of one color and 2 skeins of another of a contrasting color. COLOR A AND B SHOULD BE THE SAME COLOR AND COLOR C AND COLOR D SHOULD BE THE SAME COLOR
 
You can also work with 4 different colors of yarn however, your blanket will not show off the spiral effect as well unless one color is darker than all the other colors.  BE SURE TO MAKE COLOR A THE LIGHTEST COLOR AND GRADUATE TO THE LAST COLOR BEING THE DARKEST.
INSTRUCTIONS:
Blanket is worked in a spiral. Do not join rounds. Do not crochet over unused yarn.

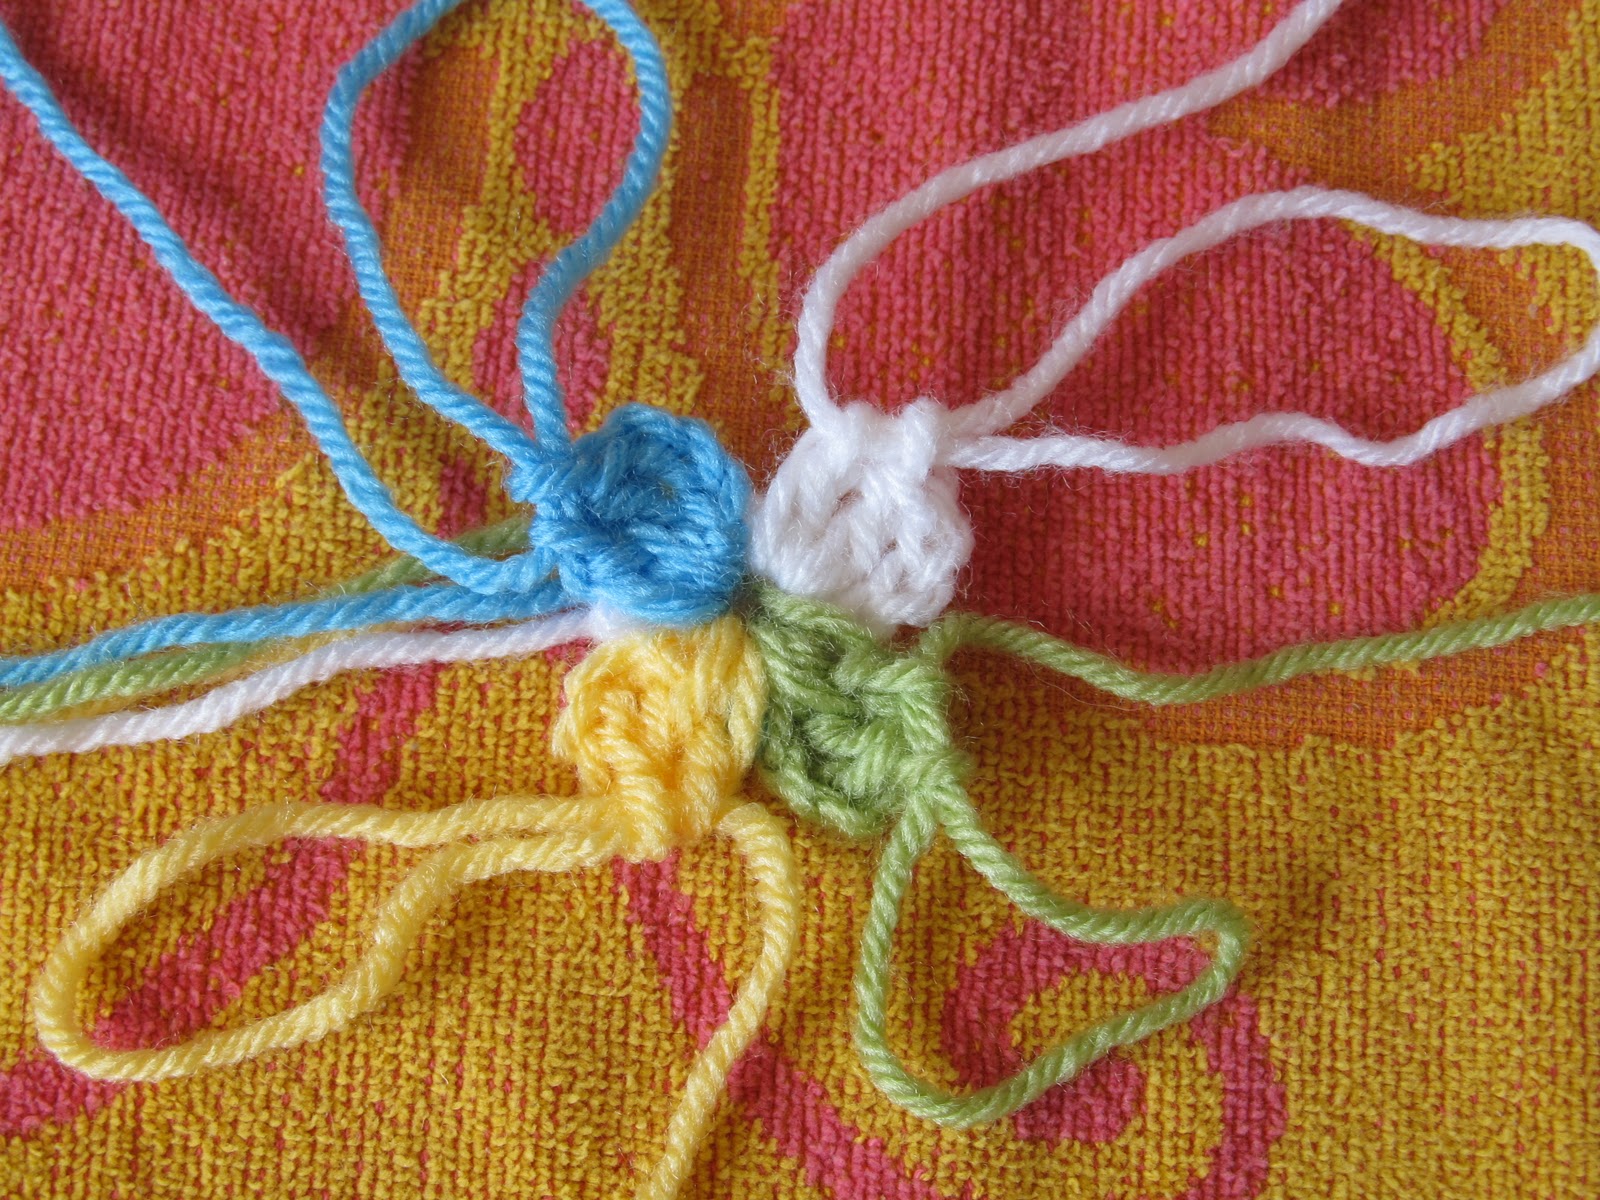
Using color A, ch 5, join with a slip st in first ch to form a ring.

Round 1: *(Ch1, sc, hdc, 2 dc) in ring,* pull up loop of yarn, insert st holder, drop color A; join color B with a slip st in ring, repeat from * to *, pull up loop of yarn, insert st holder, drop color B; join color C with a slip st in ring, repeat from * to *, pull up loop of yarn, insert st holder, drop color C; join color D with a slip st in ring, repeat from * to *, pull up loop of yarn, insert st holder, drop color D. (8 dc, 4 hdc, 4 sc)

Round 2: *Pick up color A, tighten yarn slightly, (2 dc in next st, dc in next st) 2 times, ch 1, pull up loop of yarn, insert st holder, drop color A.* Repeat from * to * with each color. (24 dc, 4 ch-1 sps) (6 sts worked in each color)


Round 3: *Pick up color A, tighten yarn slightly, (2 dc in next st, dc in next st) 3 times, ch 1, pull up loop of yarn, insert st holder, drop color A.* Repeat from * to * with each color in turn. (36 dc, 4 ch-1 sps) (9 sts worked in each color)


Round 4: *Pick up color A, tighten yarn slightly, sk ch-1 sp, (2 dc in next st, dc in next 2 sts) 3 times, ch 1, pull up loop of yarn, insert st holder, drop color A.* Repeat from * to * with each color in turn. (48 dc, 4 ch-1 sps) (12 sts worked in each color)


Round 5: *Pick up color A, tighten yarn slightly, sk ch-1 sp, (2 dc in next st, dc in next 3 sts) 3 times, ch 1, pull up loop of yarn, insert st holder, drop color A.* Repeat from * to * with each color in turn. (60 dc, 4 ch-1 sps) (15 sts worked in each color)


Round 6: *Pick up color A, tighten yarn slightly, sk ch-1 sp, (2 dc in next st, dc in next 4 sts) 3 times, ch 1, group made, pull up loop of yarn, insert st holder, drop color A.* Repeat from * to * with each color in turn. (72 dc, 4 ch-1 sps) (18 sts worked in each color) (4 groups of 18 sts)


Round 7: *Pick up color A, tighten yarn slightly, sk ch-1 sp, (2 dc in next st, dc in next 5 sts, ch 1) 3 times, three groups made, pull up loop of yarn, insert st holder, drop color A.* Repeat from * to * with each color in turn. (84 dc, 12 ch-1 sps) (21 sts worked in each color) (12 groups of 7 sts)


Round 8: *Pick up color A, tighten yarn slightly, (sk ch-1 sp, 2 dc in next st, dc in next 6 sts, ch 1) 3 times, three groups made, pull up loop of yarn, insert st holder, drop color A.* Repeat from * to * with each color in turn. (96 dc, 12 ch-1 sps) (24 sts worked in each color) (12 groups of 8 sts)

Round 9: *Pick up color A, tighten yarn slightly, (sk ch-1 sp, 2 dc in next st, dc in next 7 sts, ch 1) 3 times, three groups made, pull up loop of yarn, insert st holder, drop color A.* Repeat from * to * with each color in turn. (108 dc, 12 ch-1 sps) (27 sts worked in each color) (12 groups of 9 sts)

Round 10 through completion:  Repeat Round 9 until you are ready to finish off.  You will be increasing the number of stitches across with each round.  Where it says in Round 9 to work the next 7 sts, this number will increase with each round.  It should be evident because of the number of places that the stitches can be worked into.  Just always remember to do 2 dc in the first st after skipping the chain space.

FINISHING NOTES: Please read before finishing off your blanket. There are 12 panels. You should keep in mind that since there are 4 colors of yarn when you work the final rounds of each color, make sure that you only have 3 panels of each color of yarn as the final round. I’m not sure if that makes sense but you don’t want the final round to be 6 panels of lets say pink, 1 panel of another color and so forth as the final color. Make sure that all 4 colors of yarn have their own 3 panels as their final round.

Finishing:

On final round of color A continue pattern until you have 3 stitches left before the last ch-1 sp, (hdc in next 2 sts, sc in last st, slip st in ch-1 sp). Finish off. Repeat for each color of yarn.

Created by Donna Mason-Svara aka SmoothFoxLover@yahoo.com 2011

This pattern has been tested. Please notify me of any pattern corrections. I will answer any and all questions you may have with the instructions. Do not plagiarize this pattern. All patterns are my original designs. Please do not re-sell my patterns or give them away for free or post my patterns on the Internet. You may sell items you make from my patterns at craft fairs, fund raisers or custom orders for friends and family but please do not sell finished items on the internet without my written permission. Do not claim designs as your own.

This pattern is copyrighted by me and I give my permission for you to post pictures of items made from my pattern on your website if you will post a link back to my ETSY store if the pattern is for sale. If the pattern is free, please direct people to my blog. Be sure to list the name SmoothFox as the designer.

Testers Pictures of Fox's Four Color Spiral Blanket

Below are the tester pictures. Testers please click on the link below the pictures to post your projects.  There is one unidentified picture below that somehow I missed putting someone's name on the saved picture.  If this is your picture, please let me know.


UNKNOWN PERSON

ANGEL

DAWN
DIANE
KARIN
KATY
MELISSA
PEGGY

Here are the instructions to post a project on Ravelry


1. Click on the link below

2. http://www.ravelry.com/patterns/library/free-smoothfoxs-four-color-spiral-blanket


3. It takes you to the pattern page – you may need to log-in to Ravelry to see the “Hook it” icon in step 4

4. Click on the "Hook it" icon in the top right area

5. It will let you fill in the blanks, name your own name for the piece you worked. You can name it whatever you want. Example: Bulah’s blah blah blah. It will let you rate the pattern also. So you enter all the information about your "project" like, did you like it, did you have to add a round of sc's to make it the right size, what yarn you used etc and then you save that. General notes for other people who will see it.

6. Then there is a tab so you can add your pictures of your square or blanket or multiple squares with the same pattern.

7. If you had already created your project on Ravelry before I posted the pattern, you will need to go to the link above – highlight and copy the BOLD name of the pattern that I named it. Then go to your project page and put in this name as the pattern name link.

It's really kind of easy.

March 12, 2011

How would YOU like to receive a Presidential Award?

Did you know that by doing what you love - crocheting or knitting... you can earn an award from the President of the United States?

Here's how it works.  If you keep donating charity squares, blankets, scarves etc. to Online Angels and reach 100 hours of service towards Online Angels, you can receive (next year) a Bronze Presidential Award. If you do 250 hours you will receive a Silver Presidential Award and for the highest award of 500 hours you will receive a Gold Presidential Award.

What's the award?  How does it all work? How do you sign up?   

1.  Do what you like to do?  Crochet or knit charity items for Online Angels.

2.  When does it start?  Right now!  What you do this year will earn you an award for next year.


3.  Where do you mail your donated items to?
Online Angels, Attn: SmoothFox, 36B Pine Dr, Pottsville, PA  17901

4.  Who decides how many hours you get per item you send in?  Mary of Online Angels.  She will keep a spreadsheet and let you know how many hours you've earned toward the awards.  Please mention in a short note that you are interested in earning hours towards the award.  Be sure to give her your real name etc and a valid email address.

5.  What do you receive as an award?  You will receive a small pin - either gold, silver or bronze, a certificate to frame and a letter from the President of the United States.

6.  How do you contact Mary to ask questions:  Email Mary Reinhart  onlineangels@verizon.net

7.  Want to check out their charity?  If you’d like to see their website here is the link. http://onlineangels.myftp.org/ Be sure to click on the large angel. If you click on the “Home” tab you can select the current or priors to see how many charity boxes they have put together and shipped out.


8.  Additionally, if any of you need a tax receipt for next year, just let Mary know when you send your items to the address above as Online Angels is a non-profit charity and your generous donations are tax deductible.


Now this sounds so awesome!  You get to help those in need, feel great about yourself and receive a Presidential Award in the process.  I doubt in my lifetime I'd ever be able to get a special letter from the President of the United States.  I'm so excited about this.

If you're interested, please help us surpass our goal of charity squares and set a new goal and at the same time inspire yourself to work towards a great award.

Donna

March 11, 2011

SmoothFox's Spiral Granny Square or Blanket - Free Pattern

3 balls one color, 1 ball contrasting color 12” x 12” version above

Created by Donna Mason-Svara aka SmoothFox Copyright 2011 Version 1.0

Vanna’s Choice “Baby” 4 ply medium worsted
(1 skein, 3.5 oz, 170 yards of each color for newborn size blanket)

Color A - White
Color B – Little Boy Blue
Color C - Duckie
Color D – Sweet Pea

Hook Size H - 8 - 5.00 MM
Yarn needle
Size: 6”x6” and 12”x12” or a blanket

Special Stitches:
Shell – 3 Dc in indicated sp

My Ravelry Store: http://www.ravelry.com/stores/smoothfox-crochet-designs
My Etsy Store: http://smoothfox.etsy.com/
My Crochet & Knit related gifts: http://zazzle.com/smoothfox*
My blog: http://smoothfoxlover.blogspot.com/

If  you make this item – please click on this link below and add your own pictures as a project on Ravelry. Just click on the crochet hook with the words “Hook It” if this is a crochet pattern or if it is a knit pattern click on the words “Cast On” near the top right side and this will add your item as a project. Then you can add the pictures when you have completed your project.

http://www.ravelry.com/patterns/library/free-smoothfoxs-spiral-granny-square-or-blanket

PLEASE READ BEFORE BEGINNING YOUR SQUARE OR BLANKET

This project must be worked with four separate balls of yarn. You can work with 4 different colors of yarn. You can work with 3 balls of one color and one ball of a contrasting color. You can work with two balls of one color and two balls of another color.

THERE ARE TWO YOUTUBE VIDEO’S SHOWING HOW THIS PATTERN WORKS.


INSTRUCTIONS:

Note: You can crochet over your beginning yarn tails however do not crochet over your working yarn by mistake.

IF WORKING 3 BALLS OF ONE COLOR AND 1 CONTRASTING COLOR, COLOR D SHOULD BE YOUR CONTRASTING COLOR.

IF WORKING 2 BALLS OF ONE COLOR AND 2 BALLS OF CONTRASTING COLOR, COLOR A AND B SHOULD BE THE SAME COLOR AND COLOR C AND COLOR D SHOULD BE THE CONTRASTING COLOR

Using color A, ch 4, join with a slip st in 4th ch from hook to form a ring.

Step 1: (Ch3, 2 dc) in ring, pull up loop of yarn, drop color A;* join color B with a slip st in ring, (ch3, 2 dc) in ring, pull up loop of yarn, drop color B; join color C with a slip st in ring, (ch3, 2 dc) in ring, pull up loop of yarn, drop color C; join color D with a slip st in ring, (ch3, 2 dc) in ring, pull up loop of yarn, drop color D. (12 dc)


Step 2: *Pick up color A, tighten yarn slightly, ch 1 plus hdc in top of ch-3 of next color of yarn corner made, ch 3, 2 dc in corner, pull up loop of yarn, drop current color of yarn;* repeat from * to * with each color of yarn. (12 dc, 4 hdc, 4 ch-1 sps)


IN THE VIDEO I CONTINUED USING THE LAST COLOR USED FROM PRIOR ROUND. THE PATTERN IS WRITTEN AS IF YOU ALWAYS START WITH COLOR A.

Step 3: *Pick up color A, tighten yarn slightly, ch 1, 3 dc in next sp, ch 1 plus hdc in top of ch-3 of next color of yarn corner made, ch 3, 2 dc in just made corner, pull up loop of yarn, drop current color yarn;* repeat from * to * with each color of yarn. (24 dc, 4 hdc, 8 ch-1)


Step 4: *Pick up color A, tighten yarn slightly, (ch 1, 3 dc in next sp) repeat across to corner, pull up loop of yarn, drop current color yarn;* repeat from * to * with each color of yarn in turn. (24 dc, 8 ch-1)


Step 5: *Pick up color A, tighten yarn slightly, ch 1 plus hdc in top of ch-3 of next color of yarn corner made, ch 3, 2 dc in corner, (ch 1, 3 dc in next sp) repeat across to corner, pull up loop of yarn, drop current color of yarn;* repeat from * to * with each color of yarn.
Note last color worked will have one more set of 3 dc’s than the rest of the colors. (39 dc, 13 ch-1 4 hdc)


Step 6: *Pick up color A, tighten yarn slightly, if there are available spaces along the side of square (ch 1, 3 dc in next sp) repeat between ( ) across to corner, ch 1 plus hdc in top of ch-3 of next color of yarn corner made, ch 3, 2 dc in corner, (ch 1, 3 dc in next sp) repeat across to corner, pull up loop of yarn, drop current color yarn;* repeat from * to * with each color of yarn in turn

Repeat Step 6 until you are ready to finish off you square or blanket.

FOR A 6X6 SQUARE WORK UNTIL THERE ARE FIVE SETS OF 3 DC’S ON EACH SIDE THEN FOLLOW FINISHING STEP BELOW.

FOR A 12X12 SQUARE WORK UNTIL THERE ARE 11 SETS OF 3 DC’S ON EACH SIDE THEN FOLLOW FINISHING STEP BELOW.

INSTRUCTIONS FOR BLANKETS:

FOR A BLANKET WORK UNTIL YOUR APPROXIMATE SIZE.

FOR A BLANKET CONSISTING OF 3 BALLS OF ONE COLOR AND 1 BALL OF ANOTHER COLOR, YOU NEED TO DO THE FOLLOWING. LOOK AT TOP PICTURE ON PAGE ONE. NOTICE THAT TO END, THE CONTRASTING COLOR MUST BE ON ONE SIDE. NOTICE THAT ONE SIDE WILL HAVE 3 ROUNDS OF THAT COLOR, ONE ROUND WILL HAVE 2 ROUNDS OF THAT COLOR AND ONE ROUND WILL HAVE ONE ROUND OF THAT COLOR. IF YOUR BLANKET LOOKS LIKE THE PICTURE ON PAGE ONE, YOU ARE SET TO FINISH OFF.

FOR A BLANKET THAT CONSISTS OF 4 DIFFERENT COLORS OF YARN, YOU CAN’T FINISH OFF UNLESS EACH SIDE HAS ONE COLOR OF YARN. SO IF YOU HAVE GOTTEN AHEAD OF YOURSELF AND HAVE LET’S SAY ONE COLOR OF YARN ON TWO SIDES, YOU WILL NEED TO UNRAVEL OR CONTINUE UNTIL YOU HAVE ONE COLOR OF YARN PER SIDE. NOW YOU ARE SET TO FINISH OFF.

FOR A BLANKET THAT CONSISTS OF 2 DIFFERENT COLORS OF YARN, YOU CAN’T FINISH OFF UNLESS EACH SIDE HAS ONE COLOR OF YARN. SO IF YOU HAVE GOTTEN AHEAD OF YOURSELF AND HAVE LET’S SAY ONE COLOR OF YARN ON THREE SIDES, YOU WILL NEED TO UNRAVEL OR CONTINUE UNTIL YOU HAVE ONE COLOR OF YARN PER SIDE. NOW YOU ARE SET TO FINISH OFF.

FINISHING

Count shells on all sides. They must be even. Each side should only contain one color of yarn. Four colors of yarn should have 4 sides of one color of shells.

Finishing Step: *Ch 1, 3 dc in each sp across to corner, ch 1 plus hdc in top of ch-3 of next color. Finish off;* repeat from * for all colors.

Created by Donna Mason-Svara aka SmoothFoxLover@yahoo.com 2011

This pattern has been tested. Please notify me of any pattern corrections. I will answer any and all questions you may have with the instructions. Do not plagiarize this pattern. All patterns are my original designs. Please do not re-sell my patterns or give them away for free or post my patterns on the Internet. You may sell items you make from my patterns at craft fairs, fund raisers or custom orders for friends and family but please do not sell finished items on the internet without my written permission. Do not claim designs as your own.

This pattern is copyrighted by me and I give my permission for you to post pictures of items made from my pattern on your website if you will post a link back to my ETSY store if the pattern is for sale. If the pattern is free, please direct people to my blog. Be sure to list the name SmoothFox as the designer.

Testers Pictures of Fox's Spiral Granny Square or Blanket

Below are the tester pictures. Testers please click on the link below the pictures to post your projects.

GLORIA

GLORIA

GLORIA


CINDY 6x6

ELAINE

ELAINE

JANET

LAY

LINDSAY

MELISSA

SANDHYA

TERI

VIOLA - BLANKET


Here are the instructions to post a project on Ravelry

1. Click on the link below


3. It takes you to the pattern page – you may need to log-in to Ravelry to see the “Hook it” icon in step 4

4. Click on the "Hook it" icon in the top right area

5. It will let you fill in the blanks, name your own name for the piece you worked. You can name it whatever you want. Example: Dena’s blah blah blah. It will let you rate the pattern also. So you enter all the information about your "project" like, did you like it, did you have to add a round of sc's to make it the right size, what yarn you used etc and then you save that. General notes for other people who will see it.

6. Then there is a tab so you can add your pictures of your square or blanket or multiple squares with the same pattern.

7. If you had already created your project on Ravelry before I posted the pattern, you will need to go to the link above – highlight and copy the BOLD name of the pattern that I named it. Then go to your project page and put in this name as the pattern name link.

It's really kind of easy.

March 6, 2011

Testers Found - Spiral Granny Square or Blanket

UPDATE:  TESTERS ARE - LINDSAY, ANGEL, JANET, DEBI, TERI, VIOLA, GENEVIEVE, GLORIA, LAUREL, MELISSA, LAY

Please, don't ask to test this pattern without reading the information below. There are changes and you should make sure that you can comply.

 12x12 version using 3 balls of one color and 1 ball of contrasting color
12x12 version using 4 balls of different colors (sorry for the warp - square is unblocked)
 
6x6 version using 4 balls of contrasting color

 6x6 version using 3 balls of 1 color and 1 ball of contrasting color

This pattern has 2 video's on the blog over to the far right.  You can watch the video's however, what I'm wanting tested is the written pattern which varies slightly to the video.  In the video I got ahead of myself and found that in writing the pattern, that it was hard to write if I followed the video.  So the pattern is written as if you always start with the same color of yarn.  So remember, working the pattern per the video is fine however, I need the written pattern tested.  IF you choose to complete a blanket, I'd love to post the pictures on the blog however, the square itself must be completed testing by the date below.  There are lots of pictures in the pattern to help and you will be testing the 12x12 version.


If you want to be a tester, read the instructions below and let's get started! Remember, everyone who tests any of the patterns will have their picture of the completed tested item shown in the blog next to their name as a tester. So show off your talents. I'd really like it if when I put the pattern up on Ravelry, if each tester or person who works this pattern would add it as a project there so I can post a link to everyone who makes this items pictures.

When I find enough testers I go back and change the title of this posting from Testers Wanted to Testers Found. Before emailing me, please go back and check this link to see if the title has been changed. If the title has been changed, PLEASE do not email me asking to test. If you are currently testing an item and I haven't received your picture yet as you can not ask to test this item.

1. Must be a follower of this blog and a subscriber. Not a follower yet? Sign up. Let me know your follower name.

2. Must be able to finish testing by Friday March 11, 2011

3. Must be able to send me a picture of your finished item attached to an email. People not following through and sending me a picture or not posting on Ravelry will no longer be able to test future patterns.

4. Must be able to send me errors of any kind you find in the pattern.

5. It is mandatory as of January 23, 2011 that all testers add their test projects on Ravelry after I post the link to the pattern. Once I post the pattern, you'll need to go back to Ravelry and link it to the proper pattern. If you posted your project ahead of time, it won't be linked to the pattern without using the exact name I called the pattern once it was posted. Anyway, believe me, I will be checking. If 10 people want to test, there should be 10 projects on Ravelry.

6. You can use whatever colors of yarn you'd like but you will need either:
3 balls of one color and one contrasting color
or 2 balls of one color and 2 balls of contrasting color
or 4 balls of contrasting color
I used 4 ply medium worsted yarn. Yarns will be tangling unless you place the four yarns standing up in a box or container or lay the balls in 4 seperate areas to keep them from tangeling.

 If you want to test, send me an email to the address below with your Follower name. Only the first people emailing me will receive the pattern to test. I respond to all requests.  If you don't receive a response, send another email as your original email may have gone into spam. 

Please don't post a comment that you'd like to test. I can't send a copy of the pattern to a "comment." You have to email me as it states. Don't send me a comment through the Google feed that you want to test. You must use the email address below.

Donna SmoothFoxLover@yahoo.com